Unity Performance Bottlenecks Explained: How to Identify and Fix Them

Unity InvalidCastException Explained: Causes, Fixes, and Best Practices
February 8, 2026
Unity Rigidbody Sleep Bug: Causes, Workarounds, and Prevention
February 8, 2026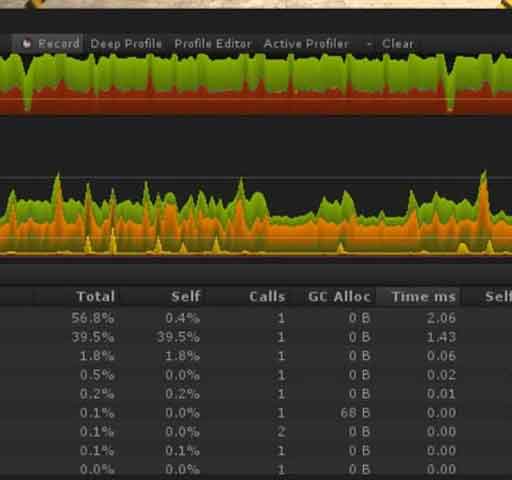
In Unity game development, performance issues can transform a smooth, immersive experience into a frustrating, choppy mess. Whether you’re targeting mobile devices, consoles, or high-end PCs, understanding and addressing performance bottlenecks is essential for delivering a polished game. This guide will walk you through the most common performance bottlenecks in Unity, how to identify them, and practical strategies to fix them.
What Are Performance Bottlenecks?
Performance bottlenecks are points in your game’s code or rendering pipeline where the system slows down, limiting overall performance. They occur when one component (CPU, GPU, memory, or I/O) becomes overloaded, causing delays that affect frame rate, loading times, or responsiveness. In Unity, bottlenecks typically fall into four categories: CPU-bound, GPU-bound, memory-bound, and I/O-bound issues.
Identifying which type of bottleneck you’re facing is the first step toward optimization. The wrong fix can waste time without improving performance. For example, optimizing GPU rendering when the CPU is the bottleneck won’t help your frame rate.
Common Unity Performance Bottlenecks
1. CPU Bottlenecks
CPU bottlenecks occur when the processor is overwhelmed by game logic, physics, animation, or script execution. Common signs include low frame rates even when graphics settings are reduced.
Common Causes:
- Expensive Update() Methods: Scripts performing heavy calculations every frame.
- Physics Overload: Too many Rigidbody objects, complex colliders, or high physics simulation frequency.
- Animation Complexity: Excessive bone counts, complex state machines, or frequent animation updates.
- Garbage Collection (GC) Spikes: Frequent memory allocations causing frame hitches.
- Inefficient Algorithms: O(n²) searches, unoptimized pathfinding, or poorly designed loops.
How to Identify:
- Use Unity’s Profiler (Window > Analysis > Profiler) and check the CPU Usage area.
- Look for spikes in “MonoBehavior.Update” or “Physics.Processing.”
- Enable “Deep Profile” to see individual method costs (warning: significantly slows the editor).
- Check the Timeline view for scripts taking excessive time.
Fix Strategies:
- Optimize Update() Methods: Move non-critical logic to FixedUpdate(), LateUpdate(), or coroutines with appropriate intervals.
- Reduce Physics Load: Use simpler colliders (boxes/spheres instead of meshes), reduce Rigidbody counts, increase Fixed Timestep (Edit > Project Settings > Time), or use physics layers to limit interactions.
- Implement Object Pooling: Reuse GameObjects instead of Instantiate()/Destroy().
- Minimize Garbage: Avoid allocations in update loops (e.g., `new Vector3()`, `GetComponent()` every frame). Cache references and use static arrays.
- Use Jobs System & Burst Compiler: For heavy computations, move work to C# Job System and Burst-compiled code.
2. GPU Bottlenecks
GPU bottlenecks happen when the graphics card cannot render frames fast enough. This is often indicated by low frame rates that improve when you reduce resolution or graphics quality.
Common Causes:
- High Draw Calls: Too many individual rendering batches (each material, mesh, and shader combination adds overhead).
- Complex Shaders: Expensive fragment/pixel shaders, heavy lighting calculations, or real-time shadows.
- Overdraw: Multiple layers of transparent objects or large particles covering the screen.
- High-Resolution Textures: Textures exceeding necessary dimensions or uncompressed formats.
- Post-Processing Effects: Heavy screen-space effects like SSR, depth of field, or motion blur.
How to Identify:
- Use the Rendering Statistics overlay (Game view stats panel) or Frame Debugger (Window > Analysis > Frame Debugger).
- Check draw calls, triangles, vertices, and texture memory.
- In Profiler, observe GPU time. If it’s close to or exceeding frame budget (e.g., >16ms for 60 FPS), GPU is the bottleneck.
- Use platform-specific tools like RenderDoc, Xcode Metal Tools, or Android GPU Profiler.
Fix Strategies:
- Batch Draw Calls: Use static/dynamic batching, GPU instancing, or SRP Batcher (URP/HDRP). Combine meshes and materials where possible.
- Optimize Shaders: Simplify shader complexity, use LOD (Level of Detail) for shaders, and avoid branching in shader code.
- Implement Occlusion Culling: Prevent rendering objects hidden behind others (Window > Rendering > Occlusion Culling).
- Reduce Overdraw: Sort opaque objects front-to-back, use camera clipping planes, and limit transparent objects.
- Use Texture Atlases & Compression: Combine small textures into atlases, use appropriate compression (ASTC, ETC2, DXT), and mipmaps.
- Adjust Render Pipeline: Switch to URP for mobile/VR or HDRP for high-end visuals with optimization in mind.
3. Memory Bottlenecks
Memory bottlenecks occur when the game uses too much RAM or VRAM, leading to crashes, stutters, or long loading times. Mobile devices are particularly sensitive to memory limits.
Common Causes:
- Texture/Asset Bloat: Uncompressed textures, high-poly models, or unoptimized audio files.
- Memory Leaks: Unreleased references, improper singleton cleanup, or subscribed events not unsubscribed.
- Excessive Asset Loading: Loading entire levels/assets at once instead of streaming.
- GC Pressure: High-frequency small allocations leading to frequent garbage collection.
How to Identify:
- Use Memory Profiler (Window > Analysis > Memory Profiler) for detailed breakdown.
- Check Unity Profiler’s “Memory” area for total allocated and reserved memory.
- Look for memory spikes when loading scenes or instantiating objects.
- Monitor for increasing memory over time (indicates leaks).
Fix Strategies:
- Optimize Assets: Downscale textures, reduce polygon counts, compress audio.
- Implement Asset Streaming: Use Addressables or Asset Bundles to load assets on demand.
- Fix Memory Leaks: Ensure proper cleanup in OnDestroy(), unsubscribe from events, nullify references.
- Use Object Pooling: Reuse objects to avoid Instantiate/Destroy overhead.
- Manage Texture Memory: Set appropriate max texture sizes, use texture streaming, and release unused assets with Resources.UnloadUnusedAssets().
4. I/O (Storage) Bottlenecks
I/O bottlenecks happen when reading/writing data from storage (disk, SSD) is too slow, causing long load times or streaming hitches.
Common Causes:
- Synchronous Loading: Blocking the main thread with Resources.Load() or synchronous file reads.
- Fragmented Assets: Many small files instead of bundled content.
- Uncompressed Data: Large files without compression.
How to Identify:
- Profiler shows long spikes during scene loads or asset accesses.
- Check for “Loading.Preload” or “Serialization” spikes in CPU Profiler.
- Platform-specific I/O profilers (Android Profiler, Xcode Instruments).
Fix Strategies:
- Use Asynchronous Loading: Implement SceneManager.LoadSceneAsync(), Addressables.LoadAssetAsync(), or Resources.LoadAsync().
- Bundle Assets: Use Asset Bundles or Addressables to group assets and reduce file count.
- Preload Critical Assets: Load essential assets during loading screens or initial startup.
- Optimize Serialization: Reduce script data size, use [NonSerialized] for temporary variables.
Step-by-Step Bottleneck Identification Workflow
- Establish Baseline: Run your game and note average FPS, memory usage, and loading times.
- Open Unity Profiler: Connect to your running game (Editor or build).
- Check CPU Usage: Identify which areas (Rendering, Scripts, Physics, etc.) dominate frame time.
- Check GPU Usage: If GPU time is high, examine rendering statistics and Frame Debugger.
- Check Memory: Use Memory Profiler to identify large allocations or leaks.
- Reproduce Worst-Case Scenes: Test heavy scenes with many objects, effects, or AI.
- Compare Before/After: Apply fixes and measure improvements quantitatively.
Platform-Specific Considerations
Mobile (iOS/Android):
- Target 30-60 FPS with lower CPU/GPU budgets.
- Use aggressive texture compression (ASTC 4×4, ETC2).
- Limit draw calls to <100-200, triangles to <100K per frame.
- Watch for thermal throttling and battery drain.
PC/Console:
- Higher budgets but expect more complex scenes.
- Utilize multithreading (Jobs System) and GPU compute.
- Implement scalable settings (Low/Medium/High presets).
VR:
- Target 72-90 FPS consistently to avoid motion sickness.
- Double rendering cost (both eyes) – optimize aggressively.
- Use Single-Pass Stereo rendering when possible.
Best Practices to Prevent Bottlenecks
- Profile Early and Often: Don’t wait until the end of development to optimize.
- Set Performance Targets: Define FPS, memory, and loading time goals per platform.
- Use Optimization Tools: Built-in Profiler, Memory Profiler, Frame Debugger, and third-party tools.
- Implement LOD Systems: For 3D models, shaders, physics, and even AI.
- Test on Target Hardware: Editor performance differs from actual device performance.
- Educate Your Team: Ensure artists, designers, and programmers understand optimization constraints.
Common Optimization Tools in Unity
- Unity Profiler: Comprehensive CPU, GPU, memory, and audio profiling.
- Memory Profiler: Detailed memory allocation breakdown.
- Frame Debugger: Step through draw calls and rendering passes.
- Rendering Statistics Window: Quick overview of draw calls, triangles, textures.
- Physics Debugger: Visualize collision bounds and physics queries.
- Asset Import Settings: Optimize textures, models, and audio on import.
Conclusion
Performance bottlenecks in Unity can stem from CPU, GPU, memory, or I/O limitations, each requiring different identification methods and solutions. By systematically profiling your game with Unity’s tools, understanding where the bottlenecks occur, and applying targeted optimizations, you can transform a sluggish project into a smooth, responsive experience.
Remember that optimization is an iterative process: measure, optimize, and measure again. With careful attention to performance throughout development, you’ll deliver games that run smoothly across all target platforms, providing players with the polished experience they expect.
Whether you’re battling draw calls, wrestling with garbage collection, or streamlining asset loading, mastering performance optimization is an essential skill for every Unity developer aiming to create professional-quality games.

![There’s something satisfying about watching a flat, boring plane turn into a mountain range. That’s exactly what a height map does in Unity. With a simple grayscale image, you can shape landscapes, add depth to materials, and create worlds that feel real instead of flat. It’s one of those tools that looks technical at first, but once you understand it, it becomes surprisingly simple and powerful. In this guide, we’ll break down what a height map is, how it works in Unity, how to use it for terrain, how it differs from normal maps, and how to control it with C#. What Is a Height Map? A height map is a grayscale image where each pixel represents elevation. Black = lowest height White = highest height Gray = values in between Think of it like a topographic map, but simplified into brightness levels. Unity reads this image and uses the brightness values to push parts of a surface up or down. The result? Hills, valleys, cliffs, and surface details created from a simple image. Height Maps in Unity Terrain The most common use of height maps in Unity is terrain generation. Unity’s Terrain system allows you to import a height map and automatically generate a 3D landscape from it. How to Import a Height Map into Terrain Create a Terrain: GameObject → 3D Object → Terrain Select the Terrain object. Open the Terrain Inspector. Choose Import Raw under the heightmap settings. Select your grayscale RAW file. Once imported, Unity converts the grayscale values into elevation data. If your height map is smooth, you’ll get rolling hills. If it has sharp contrast, you’ll get steep cliffs. Height Map Resolution Matters Resolution affects how detailed your terrain will be. A low-resolution height map creates blocky terrain. A high-resolution height map creates smoother, more detailed landscapes. However, higher resolution also increases memory usage and processing cost. If you're building for mobile, balance detail with performance. Height Maps vs Normal Maps This is where many beginners get confused. Height Map Actually changes geometry (in terrain or displacement). Creates real depth. More performance cost if geometry changes. Normal Map Does NOT change geometry. Fakes lighting to simulate bumps. Much cheaper performance-wise. If you need real terrain shape, use a height map. If you just want surface detail like cracks or scratches, a normal map is usually better. Using Height Maps in Materials (Parallax & Displacement) Height maps are not limited to terrain. You can also use them in materials. In Unity’s Standard Shader (or URP/HDRP equivalents), height maps can be used for: Parallax Mapping – creates depth illusion without changing geometry. Displacement Mapping – actually modifies mesh vertices (HDRP). For example, if you apply a brick texture, adding a height map can make the mortar appear recessed and bricks raised. Creating Height Maps You can create height maps using: Photoshop or GIMP (grayscale images) Blender (baked displacement maps) World Machine or Gaea (terrain generation tools) Procedural generation with code The key is keeping it grayscale and avoiding compression artifacts. Generating a Height Map with Code You can also generate terrain procedurally using Perlin Noise. This is common in open-world or survival games. Here’s a simple example: [csharp] using UnityEngine; public class TerrainGenerator : MonoBehaviour { public Terrain terrain; public int depth = 20; public int width = 256; public int height = 256; public float scale = 20f; void Start() { terrain.terrainData = GenerateTerrain(terrain.terrainData); } TerrainData GenerateTerrain(TerrainData terrainData) { terrainData.heightmapResolution = width + 1; terrainData.size = new Vector3(width, depth, height); terrainData.SetHeights(0, 0, GenerateHeights()); return terrainData; } float[,] GenerateHeights() { float[,] heights = new float[width, height]; for (int x = 0; x < width; x++) { for (int y = 0; y < height; y++) { heights[x, y] = Mathf.PerlinNoise(x / scale, y / scale); } } return heights; } } [/csharp] This script generates a terrain using Perlin Noise, which creates natural-looking hills and variation. Controlling Height Strength Sometimes height maps look too extreme. Other times they look flat. In terrain settings, you can adjust: Terrain height (Y scale) Brush strength (when sculpting manually) In materials, you can adjust height intensity inside the shader settings. Small adjustments make a big difference. Subtle depth often looks more realistic than exaggerated displacement. Common Problems and Fixes Terrain Looks Blocky Increase heightmap resolution or smooth the terrain. Edges Look Stretched Make sure your height map is square and uses proper dimensions (like 512x512 or 1024x1024). Lighting Looks Strange Check your normal settings and ensure lighting is baked or set correctly. When to Use Height Maps Use height maps when: You need large landscapes. You want realistic terrain shaping. You’re building procedural worlds. You need true geometric depth. Skip them when: You only need small surface detail. Performance is extremely limited. Final Thoughts Height maps are one of those tools that feel technical at first, but once you use them, they become creative tools. You’re not just editing numbers. You’re sculpting mountains. Carving valleys. Designing the shape of a world. Start simple. Import a grayscale image. Adjust the scale. Play with noise. Watch how small changes affect the landscape. Once you understand height maps, Unity stops feeling like a flat engine. It starts feeling like a world builder.](https://unityqueen.com/wp-content/uploads/2026/02/Lighting-in-Unity-150x150.jpg "Lighting in Unity: A Practical Guide for Game Developers")